 Audacity
is a piece of sound-editing software that is widely known for being
open-source (free of charge) and offering cross-platform compatibility.
Because it is free, however, there are some drawbacks. Generally,
Audacity is not as robust and polished as some other professional
sound-editing programs, and there are some bugs in the software that can
cause it to crash unexpectedly.
Some of the advantages of Audacity:
- Free of charge
- Compatible with Mac OSX, Windows, Linux and other operating systems
- Lightweight and a relatively small program size
- Open source with community support working to continually improve it
Some of the drawbacks of Audacity are:
- Several known (and unknown) bugs exist that can cause the program to become unstable
- The program is limited in its mixing capabilities
- Some aspects are more complex, and not as user-friendly
- The program is not as complete, as you will have to install plug-ins/encoders separately
Audacity can be downloaded at the following location:
(This tutorial was written using Audacity for Mac OSX version 1.3.6
in November 2008. While the screenshots and some menu items are Mac
specific, it is written to cater to all platforms. Due to Audacity’s
open-source nature, the program tends to update regularly, and some
information may become outdated. We will try to keep it updated when
possible.)
Downloading, installing and setup
Download and install Audacity
While the software makers allow users to download the latest “beta”
versions of the program, doing so may have some unexpected consequences.
Generally “beta” software is still in a testing mode and could be
unstable. If working on production material, it is suggested that users
download the stable versions until the beta versions replace them.
This tutorial was written using the latest beta version, however, to keep it as up to date as possible.
Download and install MP3 encoder
While the MP3 encoder is listed as an optional download, it is
required in order to export MP3 files. MP3 files are ubiquitous on the
Web, and their small size with relatively low quality loss ensures that
it will be quick and easy to download. Installing an MP3 encoder is highly recommended. The MP3 encode Audacity uses is called LAME.
Despite its name, LAME is a ubiquitous, open-source MP3 encoder that
allows many software applications to create MP3s from uncompressed audio
files. LAME is a reverse acronym for LAME ain’t an MP3 encoder, which is deceptive because it is an MP3 encoder. The name was a reference to the early version of the software.
From the downloads page on Audacity’s Web site, you will see some “optional” downloads. Click on the link for the LAME MP3 encoder, or follow this link: LAME MP3 Encoder.
Follow the instructions for downloading the LAME MP3 Encoder package
to your computer. Once you have extracted the package, open Audacity,
and select Preferences under the Audacity menu (Mac) or Edit menu (PC).
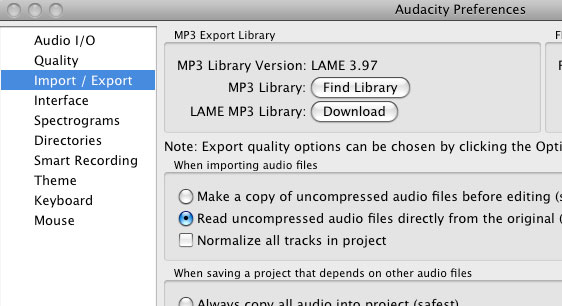
From the left menu, click on Import/Export (might be labeled differently in earlier versions of Audacity) then click on the Find Library button. If you didn’t download the LAME library yet, there is also a download button to do this here as well.
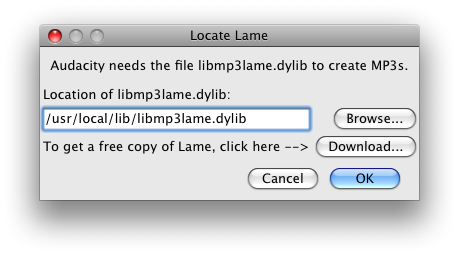
Use the Browse… button to find the location of the LAME package file, either libmp3lame.dylib (Mac) or lame_enc.dll (PC).
Click OK.
Workspace
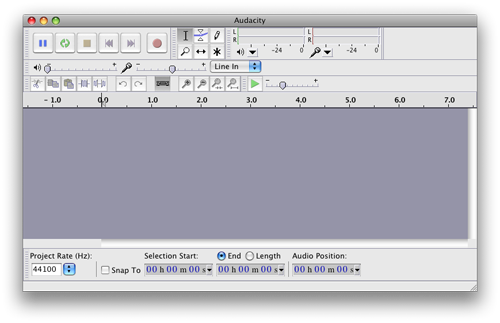
Let’s take a look at the Audacity workspace.
At the top are several buttons that allow you to play, stop, pause, fast-forward, rewind or record a track.

To the right of that are some playback and record meters
which show you the sound levels. Since the volume at which you listen
to your sound can vary depending on how load your speakers or headphones
are, these meters are important as a visual way in determining the
overall levels of your sound.

Below (or to the right, depending on how wide your window is) are some playback speed
adjustment sliders. This is generally not used in most sound editing,
but could be helpful in transcribing dictation. Be careful that this
adjustment is not changed before you export your audio file.

Audacity also comes with an UNDO button. This
feature is critical to undoing mistakes. Everytime this button is
pressed, the last previous actions are reversed in the order they
occurred. So pressing the undo button five times will undo the previous
five actions. Respectively, there is a redo button that will redo an
action if you have already undone several steps. As with most software
these days, the shortcut key to undo is Ctrl-Z (PC) or Command-Z (Mac).

Tools in Audacity

Audacity has six tools to choose from. The tool that
is selected will determine how your cursor interacts with the audio
track. Always be aware of which tool is currently selected, as it will
affect each click on the audio track.

This is the primary selection tool which allows you to highlight portions of a track to copy or paste.

This is the envelope tool, which allows you to
change the volume of certain portions of your audio track by visually
shrinking it. You can use the tool to place anchor points around the
track to guide the sound level.

The drawing tool in Audacity is probably one of the
least used tools. You have to be zoomed in extremely close to the audio
file– so much so that you can view each individual sample of the file
(typically 44,100 per second). The drawing tool allows you to edit each
of these samples, which will appear as anchor points on the file. This
can be a tedious process, but possibly useful when trying to edit out a
spurious noise like a click.

The zoom tool simply zooms the view in or out of the
track. To zoom out, right-click (PC) or control-click (Mac) on the
track. You can also click the vertical ruler at the front of the track
to zoom in vertically on the track. Where you click on the ruler will
determine what part of the track it will zoom in.

The time shift tool is used to move segments of
audio within a track. In order to split a track, you must first use the
selection tool, then choose Split from the edit menu (new versions of
Audacity only).

The multi-tool in Audacity can either be one of the
most useful, or one of the most confusing tools in the program.
Essentially the tool is a combination of the selection, envelope and
time shift tools, and its functionality is determined by what part of
the track you click, and the motions used to drag portions of the track.
Basic Audio Editing
Importing Audio
As a general rule of thumb, you should only import uncompressed audio
into any sound editing program. This means you should import .wav, .aiff
or another lossless file type. While it is technically possible to
import compressed audio like mp3 files, you would likely see a decrease
in quality as you recompress it on export.
Every time a file is compressed, it loses some quality — similar to
that of making a copy on a copy machine. Recompressing is analogous to
making a copy of a copy.
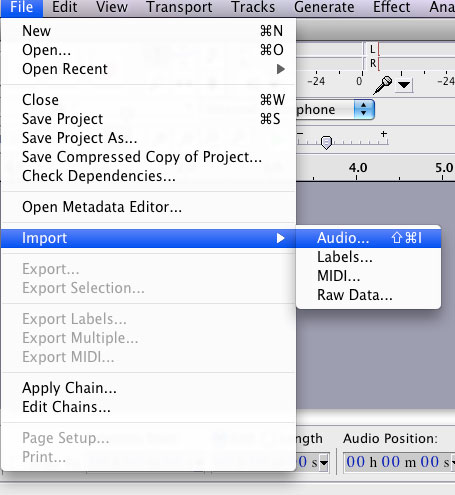
To import audio, click on the File menu and select import –> Audio.
Once imported, you can use the space bar to play your audio file, or press the green play button at the top.
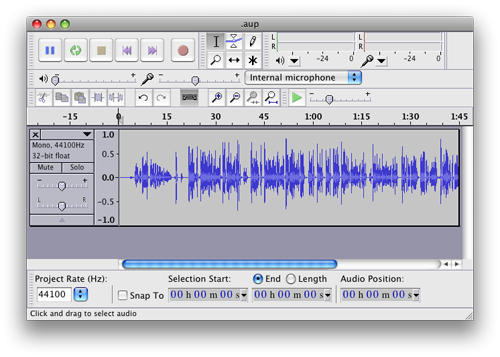
Using the Selection tool to edit audio

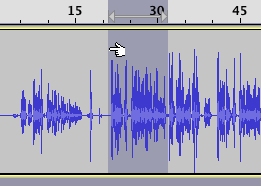
Use the selection tool to jump to various points in your track, or
click and drag to select a portion of the track. If you move the cursor
to the very edge of a selection, a small hand with a finger appears.
This allows you to change the size of the current selection.
You can press the delete key on your keyboard to remove a highlighted portion of a track. Or you can use the standard copy, cut and paste key combination to move around segments of audio.
Whenever you remove a portion of the track, Audacity automatically
slides the audio immediately after the selection to fill in the gap
left. If you do not want this to happen, use Split Delete from the Edit menu instead.
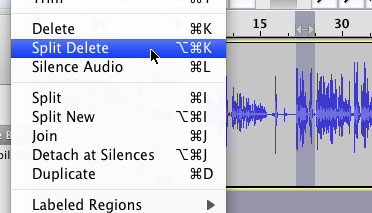
When using Split Delete, a gap is left in the audio track which will be heard as silence.
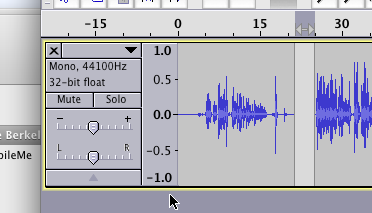
Split Delete only works with highlighted portions of audio. If you
wish to simply split a track in half without selecting it first, then
use the Split option under the Edit menu.
You can use the time shift tool to move each piece
throughout the track independently. Moving one block of audio to the
other side of another segment is technically possible, but can be
difficult to do. The first option is to simply drag it to the other
side, but in order for it to work you must have enough room to
accommodate the block on the other side. Also, you must be able to see
the other side from the view. If you can’t, you may need to zoom out.
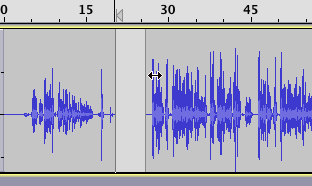
The other option is to copy and paste the block using the selection tool.
Zooming in and out
Audacity offers several different methods for manipulating the viewable workspace. We’ll start with the zoom tool.

Horizontal Zoom
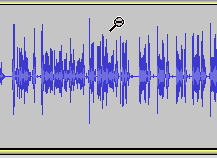
Using the zoom tool, simply click on the track to expand it horizontally.
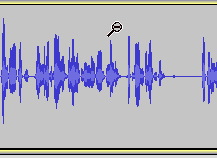
To zoom out, simply right-click on the track with the zoom tool, or hold down the shift key to change the zoom tool to a zoom out tool.
Vertical Zoom
To zoom on the track vertically, you should click the front of the
track where the amplitude measurements are displayed. But here’s the
trick: where you click on the ruler will determine which portion of the
track will be magnified.
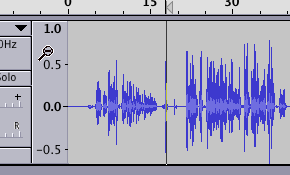
Clicking on the top of the ruler will zoom vertically on the top portion of the track.
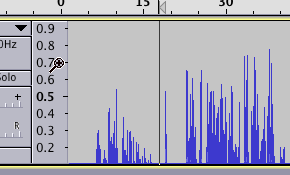
If you click on the bottom of the ruler, you would zoom in on the bottom of the track.
To zoom out, follow the same steps as the horizontal zoom: either right-click on the ruler, or hold the shift key and click on the ruler.
(Note: Audacity makes it easy to zoom in vertically by allowing you to click on the ruler with any tool. The same effect will occur. You don’t need to be on the zoom tool to cause it.)
Stretching the size of the track
You can easily change the size of the track itself by moving the mouse over the bottom edge of the track and dragging down.
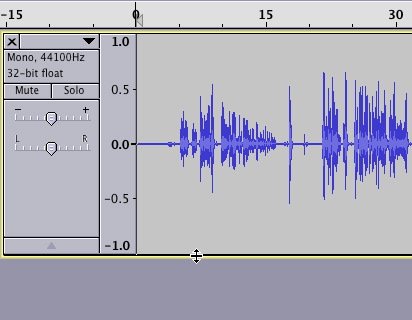
Using the Envelope Tool
The envelope tool is used to lower the volume at a particular point in the audio track. This is useful for creating effects like fade-in and fade-outs.

Select the envelope tool from your toolbar, and you will see a blue line appear around your track.
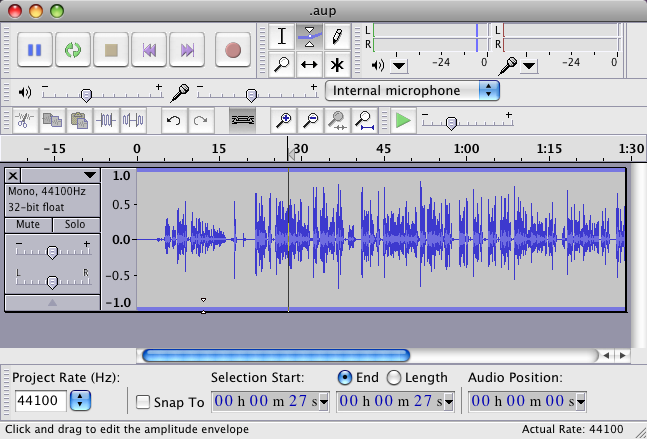
The cursor will change into two small white arrows pointing up and down. This specifies the region in which you can place an anchor point on the edge of your track. Click and drag the edge of the waveform toward the middle.
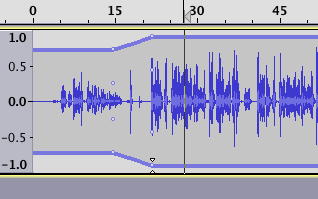
Click other areas of the waveform to place white anchor points. Parts of the waveform that are smaller, will play the sound quieter
than parts that are larger. The waveform will shrink in certain areas
giving a visual representation of how the sound is being adjusted.
Adjusting the sound levels of the audio this way does not affect the
quality, only the volume. While it might seem that you are affecting the
quality of the waveform, rest assured that this visual representation
is only affecting the loudness.
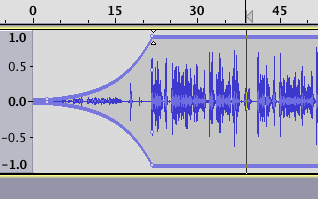
To make a fade, drag the white anchor points all the way to the middle. A curve will form allowing you to create fades.
To remove the anchor points, drag them to the left or right until they either combine with another set, or are dragged completely off the track.
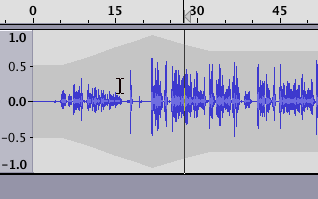
Selecting another tool will turn off the envelope function. A light
gray color will still appear in the background as a visual cue to how
the track was affected.
Adding Labels to Identify Audio Segments
When working with any audio program, you should mark areas of your
audio to help you identify different segments of your track. Editing
audio visually using an ambiguous waveform can be difficult, especially
with longer audio tracks.
Audacity, like many audio programs, includes a mechanism for labeling
different areas of your audio track and using those markers to help you
edit.
To label a particular area of your audio track, first click on the part of your track that you want to label with the selection tool, then select the Tracks menu and select Add Label At Selection, or CTRL-B (PC) Command-B (Mac).
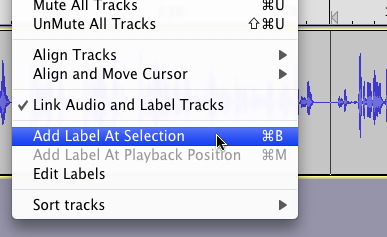
A new special labels track will be created if you did not already
have a labels track. Type in a name for the label you just created.
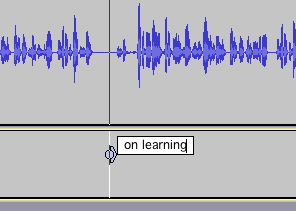
Labels should describe that portion of the track. Keep it short, so you can add multiple labels.
Adding multiple labels also helps you in the editing process by marking particular segments, and allowing you to select them.
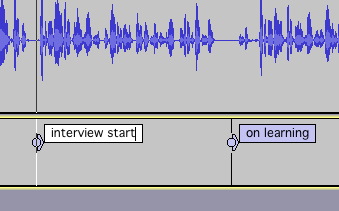
Labels don’t just have to mark a single spot, they can mark a span of audio
with markers called boundaries. To expand a label to include a span of
audio, roll the mouse over the label to highlight it first, then click
and drag the boundary to the left.
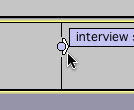
Dragging to the left will open the label to include a span of audio,
but dragging the boundary to the right will close the span or move the
boundary to the right.
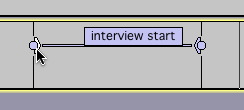
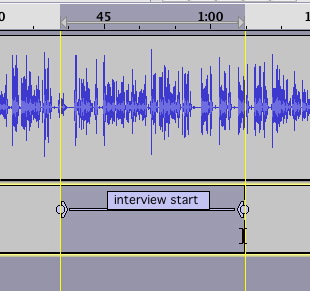
This span can be used to help you edit audio. Click on one of the boundaries with the selection tool,
then drag the selection to the other boundary. You can do this in
either the audio track, or the labels layer. If you highlight the audio
track, then essentially you will be using the boundaries as guides to
selecting your audio. If you highlight the portion that is in the labels
layer (as seen below) you can use some special labels features to
modify your audio.
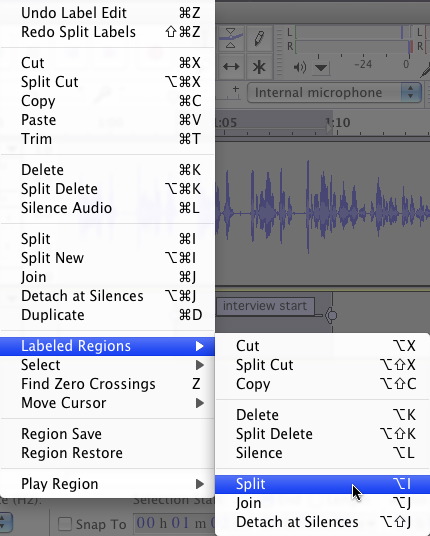
Under the Edit menu, you will find the option for Labeled Regions.
These pertain to regions of the labels layer that are highlighted.
These options will only appear if you have a section of your labels
layer highlighted.
There are lots of other features you can do with labels, such as exporting segments of your track to separate files using File –> Export Multiple. But those techniques are beyond the scope of this tutorial. Check out the Official Audacity Wiki for more information on labels.
Filters and Cleaning up Audio
Audacity comes pre-packaged with a few third party filters to help you manipulate your audio track. One of these tools is a noise remover filter that can remove sounds like hisses and hums from your audio track.
The noise remover filter cannot remove distinct sounds, like a voice or interruption — rather it is meant to reduce constant sounds that affect large portions of your track.
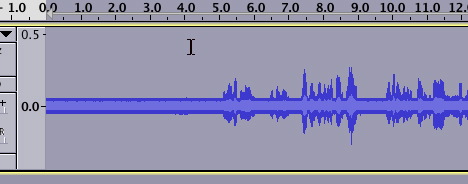
To use the noise removal filter, you must first sample a portion of your audio track that has only the noise you wish to reduce.
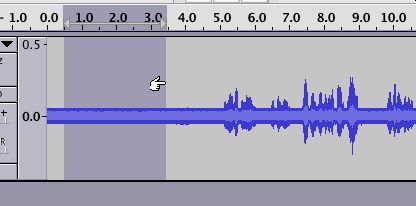
Step 1) Highlight a portion of your track that only
has the noise. This is important, or else the noise removal will sample
your entire track.
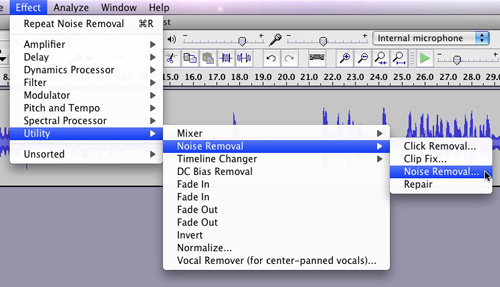
Step 2) Under the Effect menu select Utility –> Noise Removal –> Noise Removal… (location may vary depending on the version of Audacity you are using)
Step 3) The noise removal dialogue will describe the two-step process. In this first step, click Get Noise Profile, which will store a sample of the noise in the system.
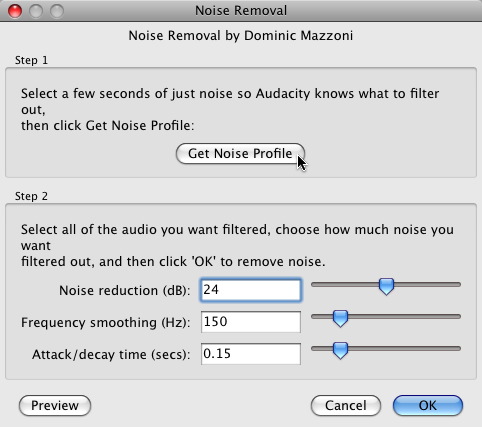
After you click Get Noise Profile, the filter will analyze the
highlighted portion of your track and learn what the “unwanted” noise
sounds like.
Step 4) You should highlight the portions of your
track that you want to remove the noise from. Most of the time, this
will be your entire track. You can select your entire track by clicking
Ctrl-A (pc) or Command-A (mac).
Step 5) Re-open the noise removal tool by clicking Effect –> Utility –> Noise Removal –> Noise Removal…

Play with the sliders at the bottom portion of the dialogue. Remember, despite its name, the noise removal tool only reduces the unwanted noise. Adjust the top slider, Noise Reduction, to specify the amount of reduction you want. The middle slider, Frequency smoothing, will attempt to recover the audio you want at the risk of adding a metalic or hollow sound. The attack/decay setting will also help recover some of the desired audio the noise reduction might remove.
The process is not perfect. Play with the sliders and click the Preview button to sample a few seconds of your audio to see how it is being affected. Once you are happy with the results, click OK to process the track.
Workflow and Saving
For journalistic audio pieces, the typical workflow is to listen to
each track first, and then “clean it up” based on either a script or
preferences of a producer. This could include removing clicks, pops,
smacks, or even portions of the audio track that you know will not
become a part of the final product.
After you clean up each track, it is good practice to export each “cleaned up file” as an uncompressed .wav or .aiff file to your project folder. The reason for this is so you have a copy of each edited track that is a part of your project.
Once you have exported each individual piece of audio, start a new
Audacity project and import these uncompressed files as various tracks
to begin the second phase of audio editing which is mixing your different tracks together.
Organization plays a big part in complex audio productions, and
building good practices will make the task of editing much easier.
Exporting audio tracks
Exporting audio in Audacity is a pretty straight-forward process. From the File menu, you have two options for exporting; you can either Export or Export Selection.
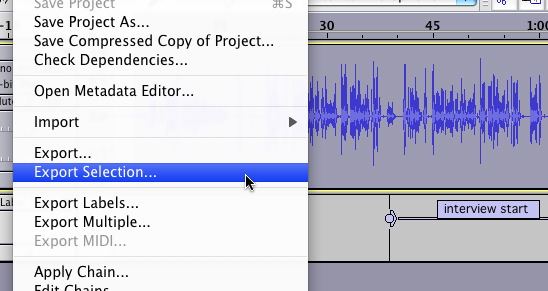
If you choose Export Selection, you will only export highlighted
regions of your audio tracks. This allows you to export only a certain
segment of your audio. If no segments are highlighted, then Audacity
will automatically highlight your entire project.
The Export option will always export the entire project.
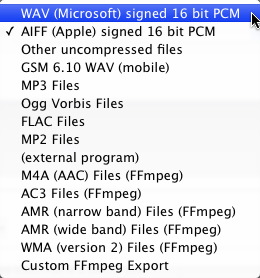
In the export dialogue box, you will be given the option to choose
the audio format. If you are exporting single tracks that have been
cleaned up, it is highly recommended that you export in either .WAV or .AIFF.
Both are similar, the difference being that .WAV was made by IBM and is
now a standard on Windows PCs, and .AIFF was made specifically by
Apple.
To ensure compatibility, it is recommended to choose .wav if you are on a PC or .aiff if you are on a Mac.
Saving your Audio Files
Once you have cleaned up and exported each audio track to your main
project folder, you can start your final Audacity audio project.
Import each track, and along the way, you should save your project to
prevent losing any hard work. Audacity only saves in its own
proprietary format called Audacity Project (.AUP)
From the File menu click Save As…
The first time you save, a warning message may come up letting you know
that the Audacity file format is not a audio file standard, but a file
type that is only for Audacity projects.
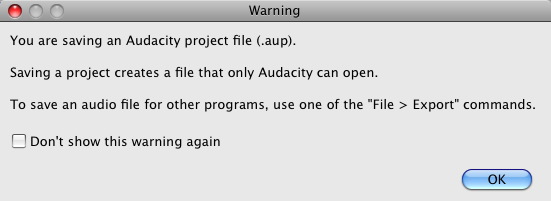
You can disable this warning from appearing in the future by checking the box.
A second dialogue box may also appear asking you about any connected
media (this warning will only appear if you have audio tracks imported
into your project).
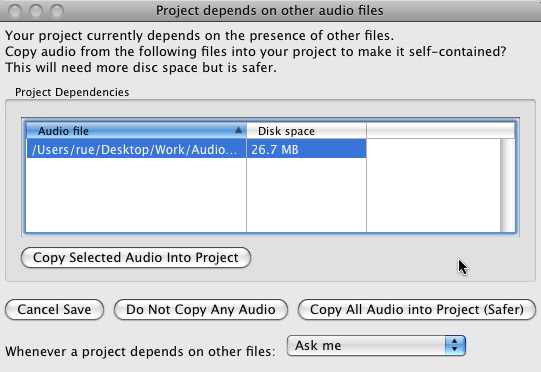
What this dialogue is asking is whether you want to copy the audio
files that are a part of your project into a special data folder that is
near your Audacity (.AUP) project file. You can either Copy Selected Audio Into Project or Copy All Audio into Project, but either way it is highly recommended that you copy all connected media into your project. and keep it self-contained.
Audacity will create a special data folder named after the project
name. For example, if your project is named “test” the folder would
appear as “test_data“. This data folder contains
information about your project, and should always be in the same
location as your audacity (.AUP) project file. If you wish to transfer
your project to another computer, you will have to copy both the .aup project file and this data folder.
Remember to save often. Crashes do happen!
Mixing Tracks
One of the foundations of audio editing is the mixing phase. This is where you take several edited individual tracks and mix them together to form a complete audio piece.
To begin mixing, import two or more audio tracks into your project. You can use the time shift tool to move the tracks left or right to adjust the timing.
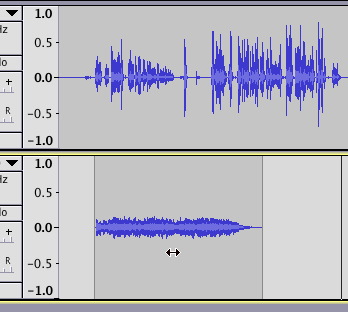
Generally, you would stack the audio tracks by level of importance or
prominence. This means narration or interviews would be on top; music
or ambient sounds would be underneath; and finally sound effects or room tone would be at the very bottom. You can adjust the order by clicking on the drop down menu at the top of each track.
Once you have imported multiple tracks of audio, it is important to name each track to help identify what is on them.
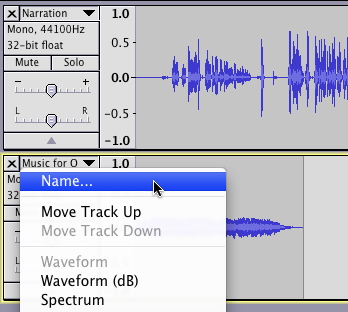
Click on the drop-down menu just to the right of the close “X” button, and select name. Identifying tracks is also important for times you want to come back to an old project.
You can use the envelope tool to create fades and adjust the volume of each track in relation to the others.
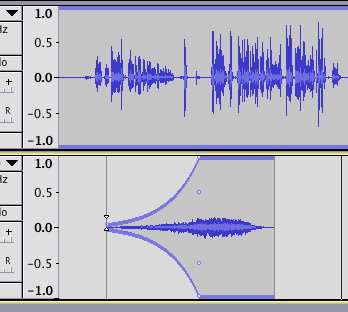
It is good practice to bring in music and ambient sounds gradually.
The goal of mixing is to keep sound effects inconspicuous so as to not
distract the listener from the primary narrative. Rather, ambient sounds
should support the narrative by adding dimension to the piece, not
overpowering it.
If you need to listen to only one track temporarily without the the distraction of the others, you can use the mute and solo buttons which will temporarily shut off other tracks.
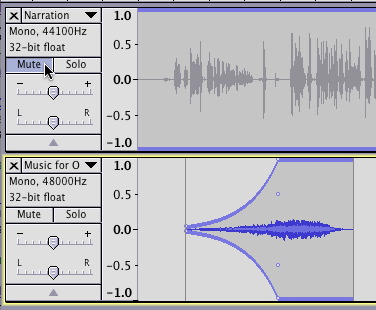
Mute will turn off the current track, and solo will turn off all
other track except the one that is soloed. These are especially useful
when mixing large projects with lots of tracks. (Remember to turn all of
your tracks back on before the final export. It is easy to forget about
a track that was muted)
Demystifying Stereo and Mono
Because of the way Audacity treats individual tracks, it is easy to
get confused about the difference between stereo and mono projects.
First, a quick review on nomenclature in Audacity.
Tracks – Tracks are individual pieces of audio. They can be either stereo or mono.
Channel – Channels refer to either the right (R) or left (L) speaker.
Stereo – Stereo refers to a track where there are two channels that are distinctly different. It will appear as one track, but with two waveforms in it.
Mono – Where a single track is distributed to both channels.
The confusion comes in realizing that, in Audacity, each track can be specified to either the left channel, right channel, mono or placed in a stereo-pair.
The next few sections will take you through a few different scenarios.
Changing mono tracks to output audio in mono
To change these settings, click the drop-down menu at the top of each track (where the track name is).
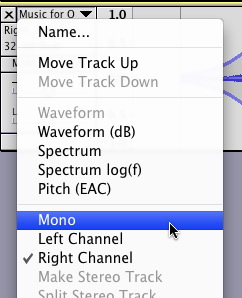
Most interviews are done with a single mono microphone. In these cases, you almost always want to use the mono
setting for each track. Setting the mono option on each track will
ensure that the audio is distributed evenly to both channels. If the
track is set to either the right or left channel, you will hear it come out of only one side during playback. If you notice this, set the track to mono.
Changing stereo tracks to mono tracks
Some digital audio recorders have stereo microphones
and will record two tracks of audio as a stereo-pair. You will know you
have this situation if you import your audio and you see a single
track, but with two waveforms, as in the image below.
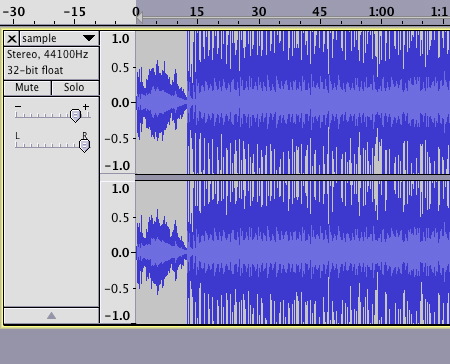
Notice that the above image is one track of audio, despite the track having two distinct waveforms. This is called a stereo pair,
and each of the waveforms is on a different channel (the top waveform
is the left channel). You cannot edit these channels individually. Any
adjustments you make will be done to both channels equally, including
when you adjust the sound envelope or cut the track during editing.
You first have to decide if you want your project to be a stereo project or mono project.
A stereo project might sound a little more realistic because it mimics
how sound is interpreted in real-life. However, the sound file will be
twice as large and that can cause slow loading speeds on the Internet.
Most serious journalistic radio organizations only use mono tracks.
Stereo can interfere with the way the story is perceived or be a
distraction. Although, in some cases, it can also add dimension to a
project that puts the listener “right there.” This choice is a
subjective one, sometimes even an ethical one. For general purposes, we recommend doing journalistic audio pieces in mono.
There are two methods to convert a stereo track to a mono track.
Method 1) Splitting the stereo track and deleting one of the channels
To split the stereo track, click on the drop-down menu above the track and select split stereo track.
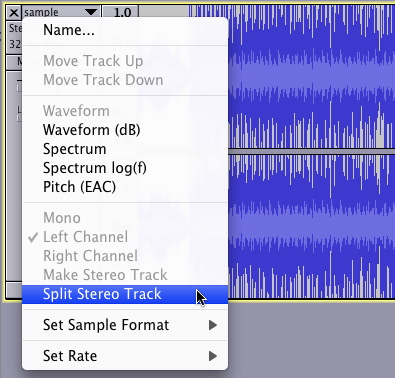
This will split the channels into individual tracks. Once you have
two tracks, you can simply delete the track you do not want by clicking
the close “X” button.
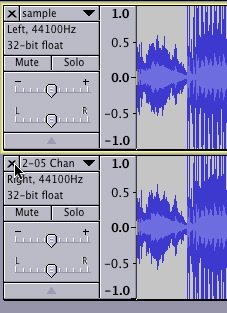
Method 2) Merging the two channels of a stereo track into one track (preferred)
If you feel that you might need audio from both channels, then you
can merge both channels into one. This could occur if you recorded an
interview in stereo, and one person might have been closer to one side
of the recorder and might sound louder on one channel.
Combining the channels ensures that sounds in both channels will be equally represented in the track.
To convert, click on the track you want to combine, and from the track menu, select Stereo Track to Mono.
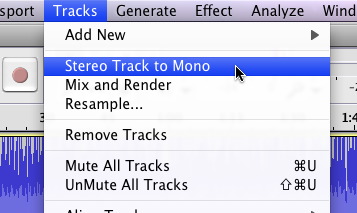
There might be some slight quality loss in combining the channels, although if there is, it would only be very slight.
Exporting Audio
The last step in audio production with Audacity is exporting your file.
To export, click on the File menu and select either Export or Export Selection. The export selection choice will export only highlighted portions of your audio.
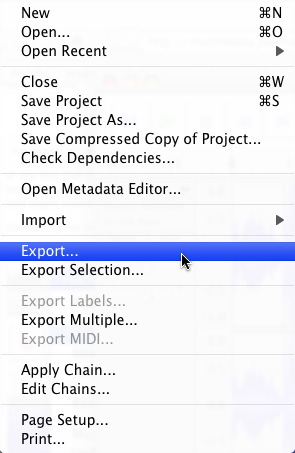
In the save dialogue, you will have the option to pick the audio format and set additional options based on that format.
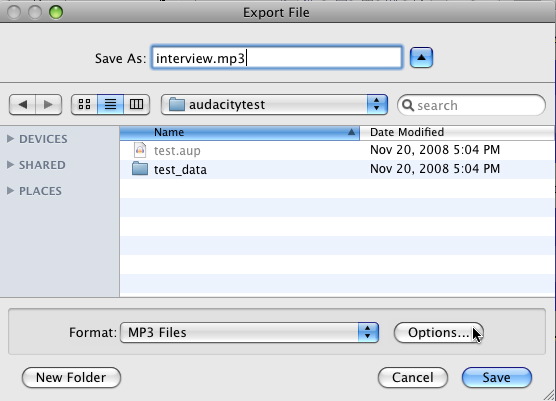
For the Format, we recommend you choose .mp3 if
your intention is to put this audio up on the Web. If you need an
uncompressed copy, say for a presentation, and the size of the audio
file doesn’t matter, then we recommend exporting in .wav (PC) or .aiff (mac). Unless there is a specific need, you shouldn’t have to select the other formats.
This tutorial will show the options for selecting .mp3, exporting for the Web. After choosing .mp3, click the Options…
button to view additional options regarding the file format. (Options
will only be clickable if you select a format that has additional
options).
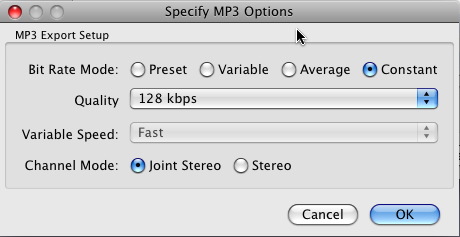
For the Bit Rate mode, we recommend choosing Constant, which will produce the best quality.
You can think of Bit Rate as the resolution of the audio. The higher it is, the crisper and cleaner the sound will be.
Bit rates that are too low will have a metallic or garbled sound to them. The standard CD quality is 128 kbps,
which is what we generally recommend. If you are a stickler about sound
quality, you can select 192 kbps for exceptional quality, but the
end-user could expect slower loading times if you have really long audio
tracks. Expect an hour-long mono audio mp3 file to end up around 30
megabytes if exported at 192 kbps.
For the Channel Mode, you will have the option to choose joint stereo, or simply stereo.
Joint stereo combines certain frequencies from both channels to create a
slightly smaller file. If you have a mono project, you should choose joint stereo
— since it won’t affect anything. If you have a stereo project, it is
also recommended you choose joint stereo, unless you specifically need
both channels to be separate.
The next dialogue box will ask you to type in some metadata in what is called an id3 tag.
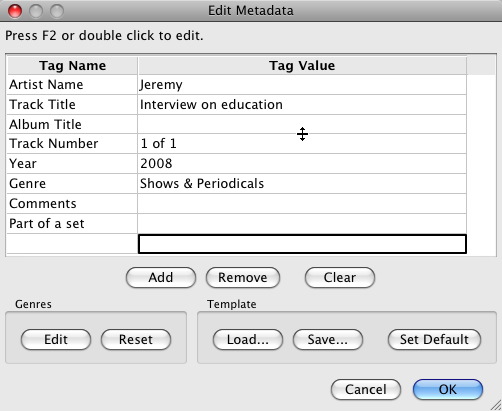
Filling in this information is completely optional, but highly
recommended. Most audio software, such as iTunes and Window Media Player
use this metadata to categorize audio files. While id3 tags are
generally built to support music files, they can be useful even for
journalistic pieces.
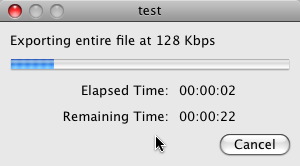
Longer files can take a while to export, an important fact to note
when on deadline. Most of the time you can expect the export to take
anywhere from half to the full length of audio to process.
No comments:
Post a Comment